I have done this, so far, only in my Test Environment, and there may be some additional steps you will have to do in your Production environment to make everything work correctly. So I strongly advise you to go through the official IBM Documentation regarding the Migration before you start the Process in your production environment.
In my test environment all Applications, including DB2 Server, run on one Windows 2008 R2 Machine. My starting point was the following:
- IBM Installation Manager 1.8.3
- IBM DB2 10.1
- IBM WebSphere 8.5.5 FP4
- IBM Connections 5.0 CR3
- TDI 7.1.1.3
From there I want to go to:
- IBM Installation Manager 1.8.4
- IBM DB2 10.5
- IBM WebSphere 8.5.5 FP6
- IBM Connections 5.5 (Including IC 5.5 Day1 iFix)
- TDI 7.1.1.3
I already had TDI 7.1.1.3 running, so there was no need to update the TDI, at least from the System Requirements point of view.
Download Time
For the upgrade I needed the following packages:
IBM Installation Manager 1.8.4
WebSphere Application Server Full Profile 8.5.5 FP6
8.5.5-WS-WAS-FP0000006-part1.zip & 8.5.5-WS-WAS-FP0000006-part2.zip
WebSphere Application Server Supplements 8.5.5 FP6
8.5.5-WS-WASSupplements-FP0000006-part1.zip & 8.5.5-WS-WASSupplements-FP0000006-part2.zip
WebSphere Customization Toolbox 8.5.5 FP6
8.5.5-WS-WCT-FP0000006-part1.zip & 8.5.5-WS-WCT-FP0000006-part2.zip
DB2 10.5
CIW3YML: IBM DB2 Server V10.5 for Windows on AMD64 and Intel EM64T systems x64) Multilingual
IBM Connections 5.5
CN808ML: IBM Connections V5.5 for Windows Multilingual
CN80DML: IBM Connections V5.5 Wizard for Windows Multilingual
Update the Installation Manager to the 1.8.4 Version
Create a backup of the whole environment before proceeding with the Upgrade.
- Extract the Installation Files.
- Run the “Install.exe” as Administrator
- Accept the license Agreement and Continue until the software is updated.
The Process is straightforward, there are no options which need to be changed.
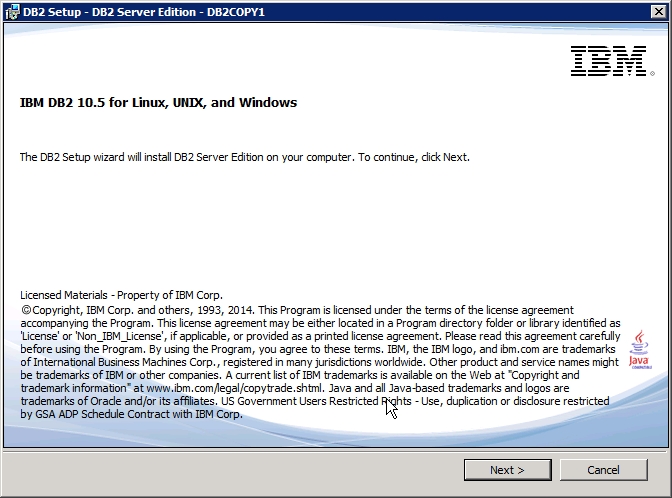
DB2 update to 10.5
On this DB2 Server I only have Connections Databases running, in a more complex environment I suggest going through the IBM Documentation regarding DB2 Update.
During the Update, if possible, always use the “db2admin” User or similar User created when the DB2 Server was first installed.
Verify that your databases are ready for Upgrade
Note: DB2 Server needs to be running.
- Start the db2 command line.
- Run the following command for all your databases
“db2ckupgrade sample -l db2ckupgrade.log -u adminuser -p password”


Make sure that all databases can be upgraded.
Update the DB2 Instance
- Stop all Applications involved.
- Log in as a instance Owner
- Backup all databases
- Start the DB2 Command Line Processor as Admin.
-
Deactivate all databases:
- Check if there are any active databases left with “db2 list active databases”.
- Deactivate with “db2 deactivate database <database_alias>”
- Check if there are any active databases left with “db2 list active databases”.
-
Stop the db2 Server
- “db2stop” command
- “db2stop” command
- Extract the Installation Files
- Start the “setup.exe” as administrator.
- Select “Install a Product” and “Work with Existing”, you need to choose the right version. We are using DB2 Workgroup Server edition.

11. Select the DB2 Copy.

12. Ignore the warning, and click “OK”.
13. After that an another DB2 Setup Wizard should start.
14. Click Next
15. Accept the license agreement
16. Choose the Installation Type.
17. In most cases it will be typical.
- Use “Custom” if you are using some of the advanced Features that are not found under “typical” installation type.
18. Click “Next”


19. Enter the Administration Account and Password, instance Owner.

20. Check the settings and click “OK”.

21. Review the settings and click “OK”.
22. Finish the setup.

23. Restart the Windows Server.
24. Download and extract the db2 license files.
25. Start the DB2 Console.
26. Enter “db2licm -l”

At this point the DB2 Server is not registered.
27. Navigate to the correct license file.
28. Enter “db2licm –a <license_file>”.

29. Check if the Product is now licensed with “db2licm -l”.

30. Start the DB2 Server.
At this point I ran into an error where “gsk8iccs_64.dll” was missing:
Error Code in DB2 Log File:
2015-12-21-14.54.09.139000+060 I4156F1113 LEVEL: Error
PID : 2628 TID : 2696 PROC : db2syscs.exe
INSTANCE: DB2 NODE : 000
HOSTNAME: SRV079
EDUID : 2696 EDUNAME: db2sysc 0
FUNCTION: DB2 Common, Cryptography, cryptDynamicLoadGSKitCrypto, probe:998
MESSAGE : ECF=0x90000076=-1879048074=ECF_LIB_CANNOT_LOAD
Cannot load the specified library
DATA #1 : unsigned integer, 4 bytes
70
DATA #2 : String, 39 bytes
C:\IBM\SQLLIB\bin\icc64\gsk8iccs_64.dll
CALLSTCK:
[0] 0x000007FEFA24614D pdOSSeLoggingCallback + 0xFD
[1] 0x000007FEF99A2B7A ossLog + 0x15A
[2] 0x000007FEF99A2A79 ossLog + 0x59
[3] 0x000007FEEF5B5985 cryptDynamicLoadGSKitCrypto + 0x745
[4] 0x000007FEEF5B49F0 cryptContextRealInit + 0x140
[5] 0x000007FEEF5B4625 cryptContextInit + 0x115
[6] 0x000007FEEE4C456E sqloRunInstance + 0x1CE
[7] 0x000000013F6027EB 0x000000013F6027EB + 0x0
[8] 0x000000013F6019A4 0x000000013F6019A4 + 0x0
[9] 0x00000000778B5A4D BaseThreadInitThunk + 0xD
[10] 0x0000000077C0B831 RtlUserThreadStart + 0x21
The solution for this was to install IBM Data Server Client
- Start the DB2 “setup.exe” as Administrator.
- Select the following option:

3. Choose the Typical installation and click next until you have reached the end of the wizard.
4. After that, the db2 Instance should start automatically.
Upgrade DB2 Databases
- Issue the “db2 list database directory” command to list all catalogued databases.
- Issue the following Command for every database:
db2 UPGRADE DATABASE <database alias> USER username USING password

Update the Schema of DB2 Databases to IBM Connections 5.5 Version
Download the latest Version of Connections Wizards.
http://www-01.ibm.com/support/docview.wss?uid=swg21972646
- Stop Connections and all other Applications using the DB2 Databases.
- Backup the Databases
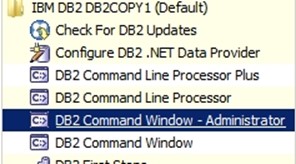
- Log on as Administrator, DB2 Instance owner, SYSAdmin Authority.
- Open the DB2 Administrator Command Window
5. Change the Location and enter the following command “dbWizard.bat”.
6. After that a “Database Wizard” should pop up. Click “Next”.

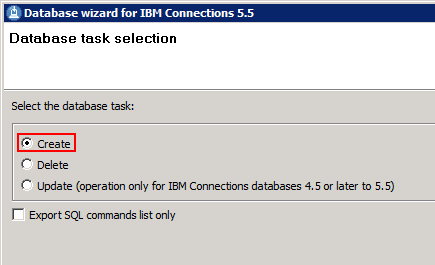
7. Select “update” database Task and click next.

- Check the details about the DB2 Instance and click “Next”.

8.Select the databases you want to update and click “Next”.

9. Review the summary and then click “update”.
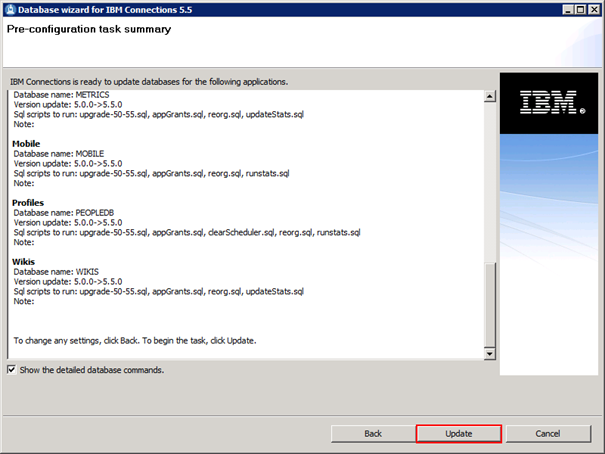
10.Click “Execute”.
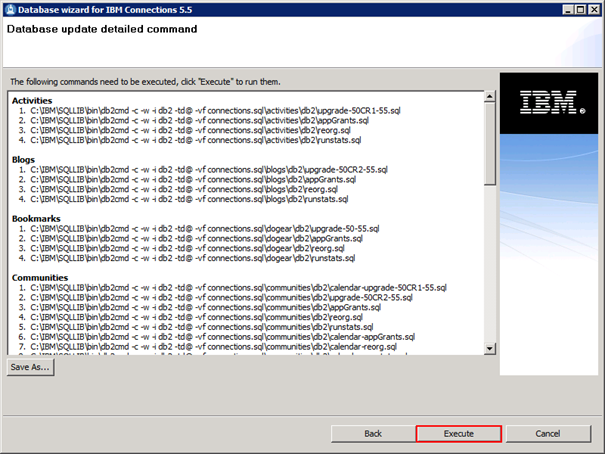
11.This can take a while, make sure there are no errors when the wizard is finished updating all databases.

Create the Push Notifications Database
- Stop Connections and all other Applications using the DB2 Databases.
- Log on as Administrator, DB2 Instance owner, SYSAdmin Authority.
- Open the DB2 Administrator Command Window

4.Change the Location and enter the following command “dbWizard.bat”.
5. After that a “Database Wizard” should pop up. Click “Next”.
6.Select “Create” Database Task.
7. Select “Push Notification” Database, at this point all other possibilities should be greyed out.

8.Select “Create” and then “Execute”.
9.Make sure there are no errors.

Uninstall the previous Version of Connections
- Backup your whole Connections Environment before proceeding.
- Start your Deployment Manager.
- Stop all other Instance of WAS, including Node Agents.
- Start IBM Installation Manager
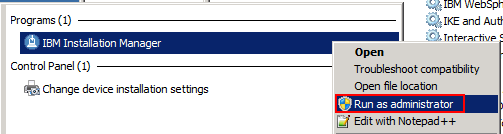
- Select “Uninstall”.

5. Select the “IBM Connections” Installation Package and then click “Next”.

6. Enter the Administrator password, click “Validate” and then proceed after the validation was successful.
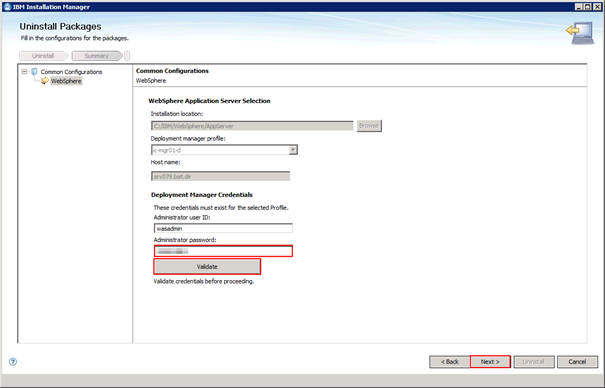
7. On the next Screen select “Uninstall”.
8. Grab some café and take a break, this could take some time… In my Environment (4 CPUs, 12 GB of RAM) the Uninstallation Process took about 50 Minutes.

9. Restart the Deployment Manager and Start all Nodes.
10. Synchronize the nodes.
11. Delete/rename/move the following files:
-
Connections Installation Files
- Make sure you do not delete the local and shared Content Store before migrating them and other files like “TDISOL” directory if it is located here, move these files if they are located in Connections Installation Root Folder.
- All of the Contents in Connections Root Folder.
- Example: “C:\IBM\Connections”.
-
IBM Connections Configuration files
- This directory is usually removed by the installation process, but make sure it is deleted before proceeding.
- Whole “LotusConnections-config” Directory, “DMGR_Profile\config\cells\cell_name\LotusConnections-config”.
- Example: “C:\IBM\WebSphere\AppServer\profiles\ic-mgr01-d\config\cells\ic-cell-d\ LotusConnections-config”
- Registry.xml File, if it is not removed already by the uninstallation process.
-
All “.py”, Python type files from the “Bin” Directory of Deployment Manager
- C:\IBM\WebSphere\AppServer\profiles\DMGR\bin
Preparing for IBM Connections 5.5 Installation
Install WebSphere Application Server 8.5.5 FP6
-
Download the Required Software (WAS Full Profile, WAS Supplements, Customization Toolbox)
- Extract and prepare the packages (some Installation Packages come in a few parts which need to be put together in one Folder), most of the time you will only need to copy the folder “native” from the second part into the first part.

3. Stop all instances of WAS Server.
4. Start the Installation Manager as Administrator.
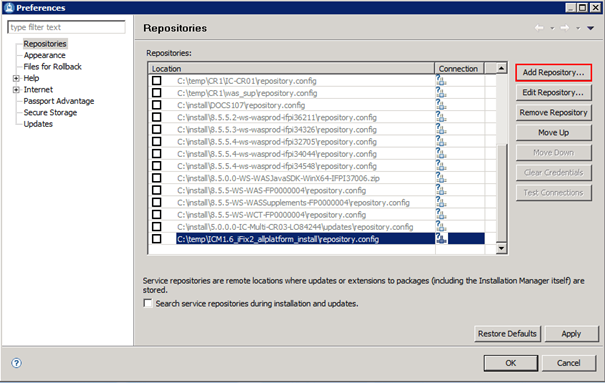
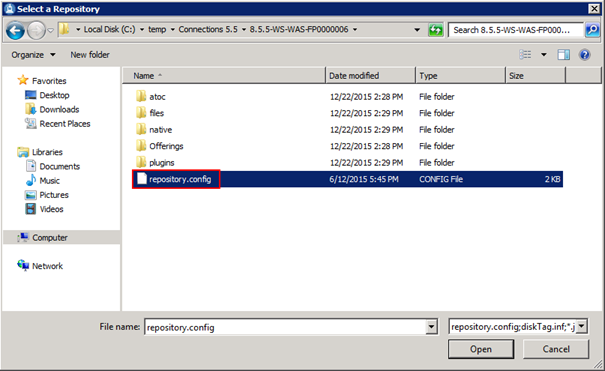
5. Add the repositories needed.


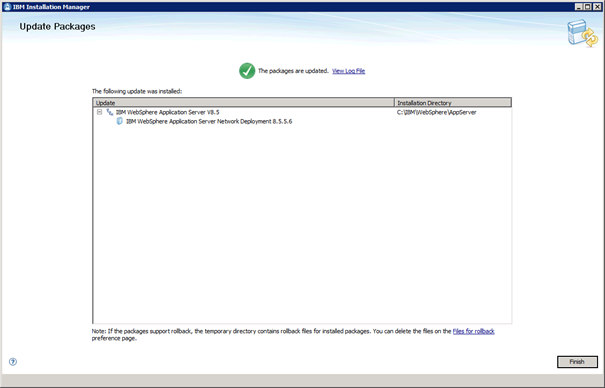
6. Install the IBM WebSphere Application Server Update.
7. Click Update

8. Select “IBM WebSphere Application Server V8.5”
9. Accept the Defaults and Update.
10. Using the same process update the Customization Toolbox.
11. Using the same process update the IBM HTTP Server.
12. Using the same process update the “Web Server Plug-ins for IBM WebSphere Application Server V8.5”.
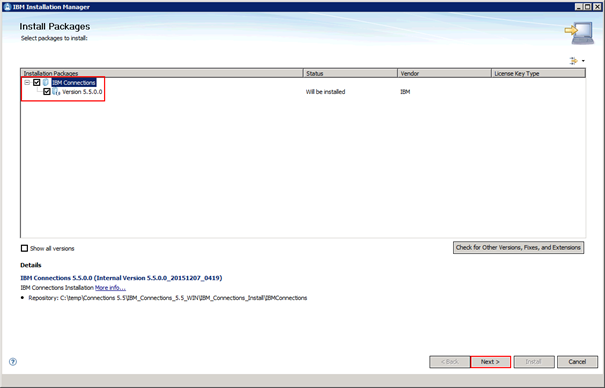
Install Connections 5.5
- Start the WAS Deployment Manager.
- Import start the Installation Manager as Administrator.
- Add Connections repository to the Installation Manager.

4. Start the Installation process.

5. Change the Installation Directory, take something other than “Program Files(x86)”.

6. Select the Features you want to be installed.

7. Fill in WAS Configuration Information.

8. Choose the Deployment Type you wish to use.

9. Insert the Database Server Configuration Information and then Click validate.

10. Select the WebServer and then click “Next”.
 11. Choose whether to Configure Cognos now.

12. Select the Content Store
You can reuse the old Content Stores, you do not have to create new ones.
13 . Delete Search related data from the Content Stores before you proceed.
- local_content_store/news/search/index
- local_content_store/profiles/cache
- local_content_store/search/backup
- local_content_store/search/index
- shared_content_store/news/search/indexReplication
- shared_content_store/search/dictionary
- shared_content_store/search/stellent/dcs/oiexport/exporter

I am using local repositories because this is a test server (I will also have to copy them later on, because the Installation directory has to be empty before the installation). In a Production Enviroment you should use a Shared Content Store which is stored on a Share, which is preferably Highly Available.
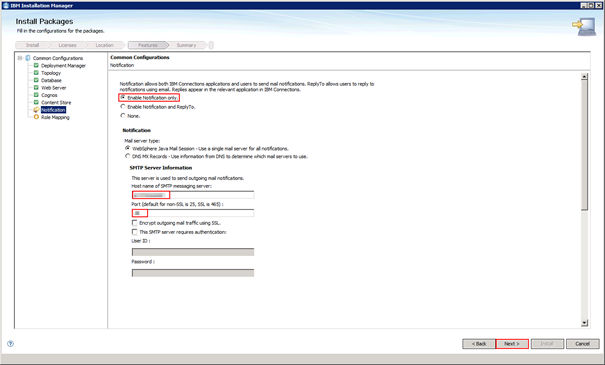
14. Enter Notifications Configuration.
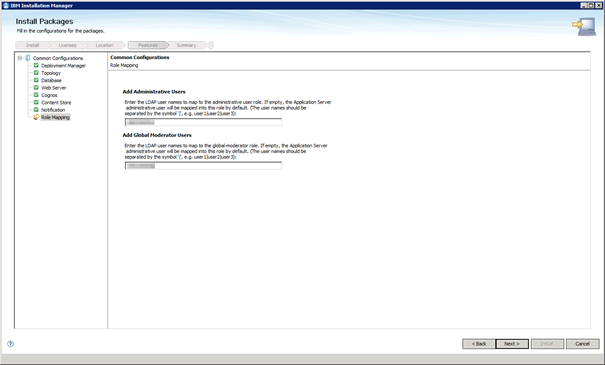
15. In the next step you can Map LDAP Users to Administrative and Global Moderator roles.
16. Review the Configuration and then click install.
17. After the Installation is complete, log in to the ISC and fully synchronize all Nodes.
18. System Administration à Nodes à Full Resynchronize
The initial Synchronization can take more than 30 Minutes.
19. Verify that all Applications are distributed, by opening SystemOut.log of the node agents.
Note: “ADMA7021I: Distribution of application <application> completed successfully” Indicates that the Distribution is completed.
- Restart the Deployment Manager and Node Agents.
- Copy the Content Store if you didn´t do it before.
3. Look into the article above for the data you need to copy from the content store.
Note: You should copy the customization directory after you have tested and made sure that the deployment works without them.
4. Delete the old Log files and Caches dmgr + nodeagent
- Log path
- Temp path
- Ws temp path
5. Start all Clusters
6. Generate and Propagate the Plug-In on HTTP Server.

Update the Connections Port and URL settings (optional)
- Stop all Connections Clusters and the Node Agent.
- Run CMD as Administrator
-
Navigate to the “bin” directory of the DMGR.
- Example: “C:\IBM\WebSphere\AppServer\profiles\DMGR\bin”
- Check out the Connections configuration
You can do that with the following commands:
- wsadmin -lang jython -username wasadmin -password passw0rd
- execfile(“connectionsConfig.py”)
- LCConfigService.checkOutConfig(“<Check out Destination>”,”<cell name>”)
You can display the cell name with the following command:
- print AdminControl.getCell()

5. Navigate to the folder where you have checked out the configuration files previously.
6. Open the “LotusConnections-config.xml” file and modify the URL and Port for each Application.
In My case I just want to change the URL.

There are many ways how to accomplish this, I prefer using Notepad ++ or UltraEdit.
7.After you are done editing, save the file and check it in again.
- With the following command: “LCConfigService.checkInConfig()”

8. After that synchronize all nodes.
Note: You can do this while you are in the same cmd Window with the following command.
“synchAllNodes()”
9. Restart all Connections Clusters.
Clear all Scheduled Tasks
- Start all Connections Clusters and the Node Agent.
- Run CMD as Administrator
- Navigate to the “bin” directory of the DMGR.
- Enter the following commands:
- “wsadmin -lang jython -username wasadmin -password passw0rd”
- execfile(“connectionsConfig.py”)
- Scheduler.listAllTasks() à This should return a rather longer list.
- Scheduler.clearAllTasks()
- Scheduler.listAllTasks() à The list should be now empty.
5. Restart the Connections Clusters to force the Scheduled tasks to be recreated.
Install the day1 iFix
Download: http://www-01.ibm.com/support/docview.wss?uid=swg21972646
You will need to download the new iFix and the update Installer as well.
- Stop all Connections Application Clusters.
-
Make sure that “WAS_HOME” variable is set.
- You can do this by runing “setupCmdLine.bat” which is located in the “bin” directory of Deployment Manager.
- Copy the newly downloaded Update Installer into the Connections Root directory.
- Run “updateWizard.bat”, as Administrator, from the “UpdateInstaller” directory.

Note: You have to run both commands in the same “cmd”.
5. Select the directory of downloaded iFix in the Update Wizard which should have popped-up until now.
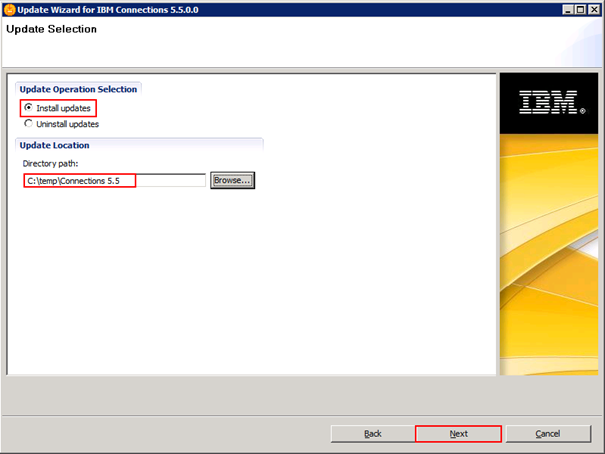
6. Select the iFix and click “Next”.

7. Enter the WAS Administrator User ID and continue.

8. Finish the installation process.

Installation took about 30 Minutes in our Environment.
9. Stop the DMGR.
10. Remove the temporary Directories of DMGR and Node Agent.
11. Start the DMGR including Node Agents.
12. Resynchronize all Nodes.
13. Start all Connections Clusters.
Java Export Policies Change
After trying to log in into Connections I saw the following errors in the Log file:
[12/23/15 15:20:21:251 CET] 000000f8 HttpMethodDir I org.apache.commons.httpclient.HttpMethodDirector executeWithRetry I/O exception (javax.net.ssl.SSLKeyException) caught when processing request: RSA premaster secret error
[12/23/15 15:20:21:251 CET] 000000f8 HttpMethodDir I org.apache.commons.httpclient.HttpMethodDirector executeWithRetry Retrying request
This meant that I simply needed to change the Java Export policies.
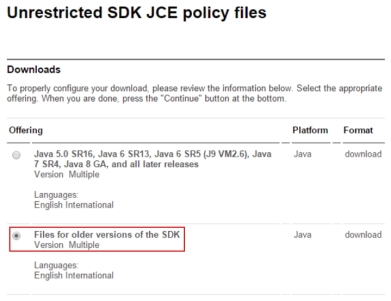
You can download the files needed from:
https://www-01.ibm.com/marketing/iwm/iwm/web/reg/pick.do?source=jcesdk&lang=en_US.
You can check the version with the “java –version” command. You should do that in order to determine which version of java policy files you need.
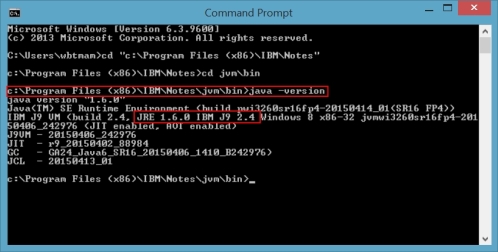
In this case I would download and use “Files for older versions of the SDK”, from the URL mentioned above.
You can just overwrite the original files located under:
- c:\IBM\HTTPServer\java\jre\lib\security
- c:\IBM\WebSphere\AppServer\java\jre\lib\security
SSO Check
- Open ISC.
- Navigate to “Securityà Global Security à Single sign-on (SSO)”.

3. Check if the Domain name is right.

I had an issue that the Domain Name had changed after the installation. If that is the case you will only be able to log-in to Profiles Application.
Errors in System.out log connected to this problem:
000001f2 DSXSearchEngi E com.ibm.connections.directory.services.engine.DSXSearchEngine search CLFRK0004E: Directory Service Extension(DSX) received a HTTP response from URL ‘https://social-d.bat-groupware.at/profiles/dsx/instance.do?login=WBTSTT’ expected XML, received unexpected content-type ‘text/html;charset=UTF-8’!
[12/28/15 13:39:07:056 CET] 000001f2 DSXSearchEngi E com.ibm.connections.directory.services.engine.DSXSearchEngine search X-LConn-Auth=false
[12/28/15 13:39:07:056 CET] 000001f2 DSXSearchEngi E com.ibm.connections.directory.services.engine.DSXSearchEngine search /profiles/login returned:
AbstractHomep E CLFRQ0415E: An error occurred while executing the action. See nested exception for more details.
com.ibm.lconn.homepage.web.WebException: CLFRQ0341E: Could not retrieve details for the user with login ID: WBTSTT due to an exception. The exception occurred when retrieving the details via Profiles Directory Service Extension: [Ljava.lang.Object;@f6273db5
[12/28/15 12:55:51:113 CET] 0000017e AbstractDirec W EJPVJ9246E: Unable to query the directory service by field j2eePrincipal for WBTSTT. [UserImpl@f5ff182c id=00000000-0000-0000-0000-000000000000 directoryId=00000000-0000-0000-0000-000000000000]
At this point you should be able to login into Connections. J
Configure the new TDI Wizard for IBM Connections 5.5
- Run “IBM_Connections_5.5_Wiz_win.exe” to extract the new TDI Wizard.
- Copy the newly extracted files on the Machine where TDI is installed, preferably in the “IBM” Software installation folder.
- Run the “populationWizard.bat” as Administrator.
- Select the Location of TDI Installation Directory.

5. Choose the correct database type.

6. Enter the Connection details of the DB2 Database, then click next.
Note: From this point on you may need an LDAP Search Browser.

7. Enter the LDAP server connection details.
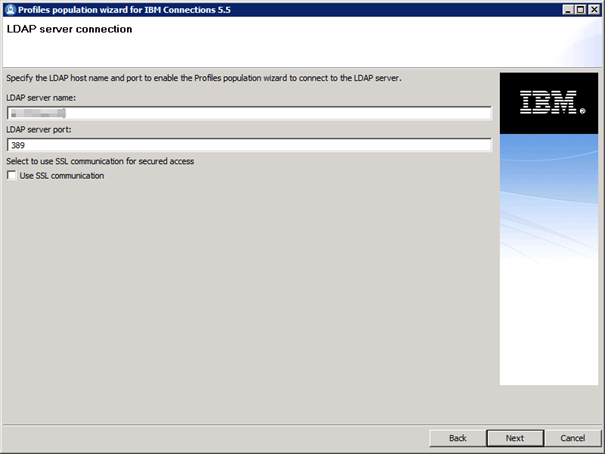
8. Enter the LDAP authentication properties.
9.Enter the LDAP User search base and the LDAP search filter
Note: You can copy the settings from the old TDI Wizard, they are all saved in “profiles_tdi.properties” file, which is located in the directory of the old TDI wizard.
- You will need the value of “source_ldap_search_base” and “source_ldap_search_filter” attributes for this step, just search for them in the file mentioned above.
10. On the next screen you can configure the Profiles database mappings.
- Here you can use the “map_dbrepos_from_source.properties” file, in the old TDI Wizard directory, as reference.
11. Select the Optional database tasks if you need them and then click “Next”.
12. Review the Settings and then click “Configure”.
13. Make sure there are no errors after the Wizard finishes.
14. Now you can create a scheduled task, which will make sure the TDI Wizard runs at defined Interval, or simple change the existing one by editing the location of “sync_all_dns.bat” file, pointing to the file in the new Wizard directory.

Post Migration Tasks
- Didn´t had to recreate the search index, because I deleted it from the content store and local data before installing the Search application. You can check if the Search index is recreated by navigating to local Search index directory: “connections_root\data\local\search\index”. There a current “INDEX.READY” and “CRAWLING_VERSION.” Files should exist.
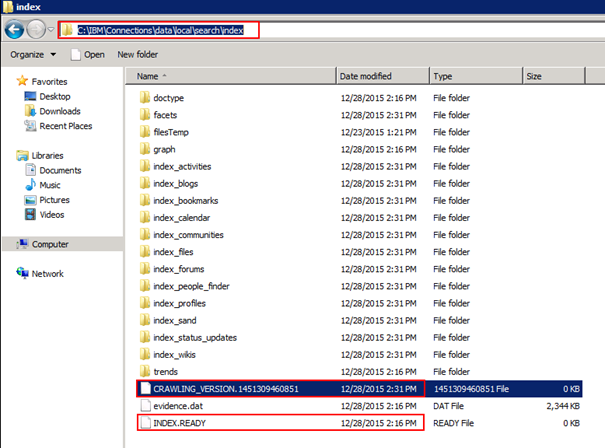
If that is the case, than most likely the Search is functioning correctly.
You can verify that the Search works correctly by using the following URLs (you need to use an Administrative Account):
https://<connections server URL>/search/serverStatus
https:// <connections server URL>/search/serverStats
Synchronize files that are shared with Communities
- Initialize the “wsadmin” command prompt.
- Enter “execfile(“filesAdmin.py”)”
- After that enter “FilesDataIntegrityService.syncAllCommunityShares()“.

After the task is completed you will see the following line in the Log File:
000001b1 SyncCommunity I EJPVJ9366I: The task Synchronize all Community shares has finished at December 28, 2015 2:55:38 PM CET.
This should be it, now you should be able to log in into Connections and the peopleDB will synchronize with your LDAP directory.

Thanks for sharing your experiences!
LikeLiked by 1 person
Nice job but what do you mean by “I had an issue that the Domain Name had changed after the installation” because I have the same error in my systemout.?
LikeLike
The Domain Name defined for SSO (LTPA) changed and therefore I could not login. Take a look at the Screenshot: “https://milanmatejic.files.wordpress.com/2016/01/011516_0838_ibmconnecti64.png?w=809”. Make sure that the domain name corresponds with the URL you are trying to login, for example if you are trying to log in on “https://connections.renovations.com”, the “Domain Name” field should have “.renovations.com” value.
Are you upgrading to version 5.5? Did you run into this problem by some other cause?
LikeLike
The sso domain name was mispelled. That was the cause of my problem. It’s now solved. I also installed Docs 2.0 but used the old install method with maual scripts because using the new wizard failed.
Thanks again for your feeback.
Jacques
LikeLiked by 1 person
Great, I am glad you solved that.
Best regards,
Milan
LikeLike
Just found your BLOG! Congrats, very interesting Post. I have to perform an upgrade from Connection 5.0 to Connections 5.5 and it is always nice to read others persons share their experiences with us.
LikeLiked by 1 person
Thank you!
LikeLike
thank you for your blog, you helped me to solve a search problem
LikeLiked by 1 person